Sunday, November 20, 2011

Turkey Bacon Green Beans

With Thanksgiving right around the corner here in the U.S. I decided to post a quick and easy recipe tutorial today for a side dish that anyone can whip up and take to a potluck Thanksgiving dinner.

We make green beans often at my house and my husband loves it with the crunchy bacon bits.  I fool him and use turkey bacon instead of the real stuff.  Once its crispy and chopped up he can't even tell the difference and I cut back the fat by 50%.  Win-win for everyone.


Ingredients:
1-2 lbs of green beans (I use frozen here but fresh works also)
turkey bacon (or bacon of your choice... you can even omit this ingredient altogether)
salt
pepper
olive oil
water


Directions:
Step 1: Crisp up bacon-
- add 1 tablespoon of olive oil to a pot on medium high heat
- Chop bacon into bite size pieces and add to pot
- separate bacon with spoon or tongs
- cook on medium/high heat for 8-10 minutes or until crispy
- drain on paper towel and set aside

Step 2: Cook green beans-
- add frozen or fresh green beans to same pot used to crisp bacon
- add 1/4 cup of water and cover
- cook on high for 5 minutes, stirring occasionally
- uncover and cook another 5 minutes until most of water has evaporated
- add some bacon bits and stir
- serve on platter and top with more bacon bits.

Monday, August 8, 2011

Creamy Peanut Chicken Rice

My husband suggested I make this week's cooking tutorial my Creamy Peanut Chicken Rice.  I'm pretty sure he suggested it because he wanted to eat it for dinner this weekend.  He thinks he is slick... but he's not. Either way I did take him up on the suggestion because it's such an easy dish to whip up!  It's great for those days you have left over rice and are not sure how to revamp it.  I especially love it because it's a one pot meal!

On a lazy day we will eat it by itself.  But I will usually pair it up with some sauteed or roasted veggies or a nice salad as well.

I've included the step-by-step video tutorial below!  Hope you give it a try and enjoy!
Ingredients:
4 cups cooked rice
2 chicken breasts
olive oil
2 teaspoons curry powder
1 teaspoon dried thyme
salt/pepper
2 tomatoes
1 onion
2 garlic cloves
2 chilies (optional)
1/2 cup peanut butter
water


Buen provecho!

Monday, July 4, 2011

Happy Fourth of July!

Here is my gift to you!  A new video tutorial on how to make Apple Pie Turnovers! They are delicious and are perfect apple pie substitute because you can eat them on the go!
Enjoy!

Saturday, June 11, 2011

Dehydrated snacks!

I finally took the plunge and ordered a food dehydrator! Do you have one? 

After much research I decided on the Excalibur 3900.  It has 9 trays!
I have been having a blast coming up with new goodies to dry.  This morning I put in some banana, pear, and garden-picked roma tomato slices.  Cool, eh?  Now I can make my own "sun" dried tomatoes!

I am also making some strawberry and banana fruit leather.  You know... like the Fruit Roll Ups they sell that are super expensive and filled with who knows what.  I'm making my own and let me show you how easy it was. 

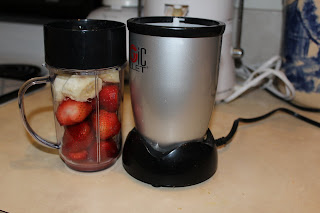
Load 7-10 strawberries and a sliced up banana in your blender or Magic Bullet
and puree until completely smooth. If it needs a little liquid to help it blend I squeeze a little lime juice instead of water.  Then pour half the mixture onto one of the Excalibur Paraflexx sheets (purchased separately) and then I like to tilt the frame around to get the mixture to spread out a bit.  

Repeat on another Paraflexx sheet and frame.  Place into the dehydrator at ~145 degrees F and let it go for about 5-7 hours.  That's it!

Once its dry you can peel it off the Paraflexx sheet and enjoy!

Now if you'll excuse me... I"m off to snack on some yummy dried pears while the fruit leather dries!

Tuesday, April 12, 2011

Burger Night!

Last night I had a lazy night in the kitchen and wanted to make something quick and yummy!  So, I decided on BURGERS!
I made the bread earlier in the day so it worked out perfectly that I had a few buns just the right size for the burgers.

Burgers are super easy to make and they are the perfect culinary medium for experiments.  New ingredients into the meat, exotic toppings, etc.  Just use what you have or try new ingredients!

For this burger here's what I did:

-In a large bowl I put about 1 1/2 lbs of ground beef.  You can use 80/20 for a fattier juicier burger.  But I used 90/10 beef.
-Grate in 1 onion, 2 cloves of garlic and 1 jalapeƱo pepper.
-Add 1 teaspoon of salt
-Add 1 teaspoon of ground black pepper
-Combine with hands until all ingredients are evenly distributed. 
- Make your burger patties and put on a hot grill (or frying) pan and do not move or touch for about 3 minutes. 
-Flip burger over and cook another 3-4 minutes depending on how you like your burgers cooked. 
-Never press on your burgers because that will cause all the juices to run out- resulting in a dry and hard burger.
-When the juices that are running out of the burger are clear (and no longer red) then it has been cooked to a medium-well or beyond.  So, if you want it more on the medium side cook about 3 minutes on each side.
-Remove burgers from pan and let them rest while you prep the buns.
-I like to toast my buns- you can do this in a toaster, toaster oven or on the grill pan.

Topping:
- 2 Tablespoons of cream cheese
- hot sauce of your choice
-2 Tablespoons of chopped cilantro

-Mix all the ingredients in a bowl and spoon on top of burger.  Then top with a few tomato slices and baby spinach. 

Enjoy!

Sunday, April 3, 2011

Handmade bread the easy way!

Many of you have asked for a generic bread making recipe and tutorial and here it is! You don't need any fancy breadmaking machine or equipment!  It's so easy anyone can do it.  I'd love to hear from you after you try it out... and let me know what fun ingredients you decided to put in your bread.

p.s.- I'm a semifinalist in YouTube's NextUp Contest! I would really appreciate your votes. It's really simple... Just click this link: http://www.youtube.com/creators?x=nextup_nsFqzT7Iwpc
and give my video a "thumbs up."  You can vote every day until Friday, April 8, 2011. Thank you!


Now... enjoy your breadmaking video!

Wednesday, March 23, 2011

I'm back!

So sorry it's been like 6 months since I've posted a recipe on this blog! Crazy, I know.. but I've been super busy with my sewing and quilting stuff.  I'm back and I'm making an effort to try and post as regularly as I can on here.

A friend asked me to post this recipe for Ropa Vieja (literally means "old clothes" in Spanish.  This is a popular dish in Miami (where I grew up) and is cooked in the Canary islands (by Spain) and Latin America, specifically in places like Cuba, Puerto Rico, Dominican Republic, etc. 

Ropa vieja is basically shredded beef in a tomato based sauce and it is delicious!

Every household is going to have their own recipe so I'm only sharing one of my ways of making it with the hopes that this will help some of you make and perfect your own version.
We are eating it for dinner tonight with some moro de trigo (bulgar wheat and red beans.. but you can eat with just about anything!  I've even seen it stuffed in a bun and made into a sandwich. 

Ingredients:
- Oil
- a large onion
- 3 cloves of garlic
- 2 lbs of flank steak
- 1/2 a green or red bell pepper
- 2 bay leaves
- 2 chicken or beef bouillon cubes (the big ones)
- A 28 oz. can of crushed or pureed tomatoes


Directions:
In a large pot over medium heat pour about 2 tablespoons of oil (I use canola or extra virgin olive)As the oil warms up chop your onion, garlic, and pepper.  Add to oil and stir for 3-5 minutes until veggies are soft and translucent.  Add the chicken or beef bouillon cubes and stir until the dissolve in the pot.  Add the entire can of tomatoes and bay leaves.  Now add the entire flank steak and submerge it in the sauce.  Add a few cups of water until the flank steak is covered in the sauce completely.  Bring to a boil.  Then cover with a lid and lower the heat to medium-low and let it simmer for 2 to 2.5 hours or until the meat can be easily shredded with a fork.  I like to check the pot every 20-30 minutes or so to make sure it hasn't dried out.  If you see the sauce reducing too low, add some more water to help cook and tenderizer the meat for shredding. 

Ropa vieja can also be made in a slow-cooker or crock pot. Just let it go all day and the longer the meat simmers the easier it will shred. 

I like to shred the meat by grabbing two forks and pulling the meat apart between the forks.  Pull out the bay leaves before you serve and enjoy!